Displaying items by tag: plugin
jBackend Custom Modules
If you need to integrate your Joomla site with another system or offer a service through a set of accessible API, jBackend is the right extension for you. jBackend can be extended with custom plugins to support any kind of extension and provide any kind of service. There is a detailed documentation which explains how to create your own modules. And if you are not a programmer you can HIRE US and get the job done right.
Reasons for success with us:
- We have a long experience as system integrator;
- We are a Joomla experts with a great reputation from the community;
- We are cheap... really, prices from 20 euro;
- And moreover, we are the creators of jBackend, so we know what we do.
How to get in touch with us:
To request a quote without engagement, This email address is being protected from spambots. You need JavaScript enabled to view it. or compile a request form, or access to Client Manager and create a new project request.
Installation procedure
jBackend basic extension has just one package to download and install. The package includes the component and three plugins (User Module, Content Module, and Push Module), and support the installation with "upgrade" mode, so there’s no need to uninstall any previous installed version.
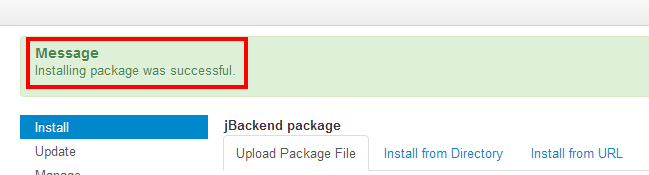
To install jBackend, login to Joomla backend as administrator, and go to menu "Extension Manager". Click the browse button, select the package file (jBackendX.X_J3.zip) and click the installation button.

The package will be uploaded on the server and then installed. After installation finished a message will report a successful message.
That’s all. Now we are ready to start using jBackend.
Upgrade procedure
When upgrading from a previous version of jBackend, there is no need to first uninstall the old package. As mentioned earlier, jBackend supports the "upgrade" mode for the installation, so is enough to just install the new package over the old one. The component and the three plugins included in the basic package will be upgraded.
Note that during the upgrade also the database tables are upgraded when needed, but without to delete or loose any table data. It is in charge of the installation process to upgrade tables structure if needed. All the data (e.g. API Keys) will be preserved.
Installation procedure
Tag Meta extension has just one package to download and install. The package includes a component and a system plugin, and supports the installation with "upgrade" mode, so there's no need to uninstall any previous version of Tag Meta.
To install Tag Meta, login to Joomla backend as administrator, and go to menu "Extensions manager". Click the browse button, select the package file (TagMetaX.XCommunity.zip or TagMetaX.XEnterprise.zip) and click the installation button.

That’s all. Now we are ready to start using Tag Meta.
Upgrade procedure
When upgrading from a previous version of Tag Meta, there is no need to first uninstall the old package. As mentioned earlier, Tag Meta supports the "upgrade" mode for the installation, so it is enough to just install the new package over the old one, both component and plugin will be upgraded.
Note that during the upgrade also the database tables are upgraded when needed, but without to delete or loose any table data. It is in charge of the installation process to upgrade tables structure as needed. All the rules will be preserved.
Plugin settings
In this paragraph we will explain the meaning of each plugin parameter. To edit plugin settings go to menu "Extensions" -> "Plug-in Manager", find "System - ReDJ Community" or "System - ReDJ Enterprise" in the list and click on it to access to configuration page.
Basic Plugin Parameters
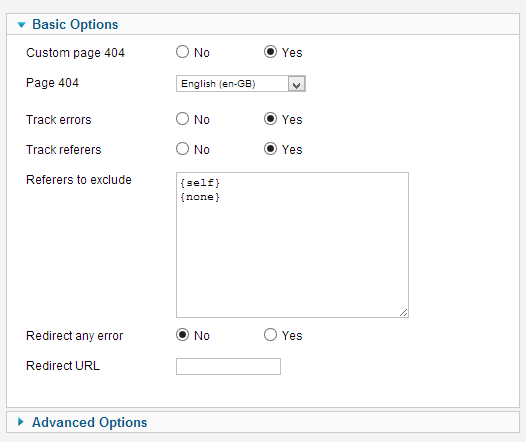
In the following table there’s a list of all basic plugin parameters.
| Name | Value | Description |
|---|---|---|
| Custom page 404 | No/Yes | No, disables. Yes, replace Joomla standard error page with a custom one. |
| Page 404 | Drop-down list | Allows to select the custom error page to use. Pages can be created under the ReDJ component, section "Pages 404". The page is used only when "Custom page 404" option is set to Yes. |
| Track errors | No/Yes | No, disabled. Yes, enable errors trace for site URL calls (trace data are visible under ReDJ component). |
| Track referrers | No/Yes | No, disabled. Yes, enable referers trace from site visitors (trace data are visible under ReDJ component). |
| Referers to exclude | Text | List of domains to ignore when tracing referers from site visitors, one per row (e.g. www.google.com). The following macros are also available and can be indicated each one on a single row: {self} to exclude the own domain (i.e. internal referer), {none} to exclude visits without referer. |
| Redirect any error | No/Yes | No, disabled. Yes, redirect any error call, that don’t match with any (active) redirect item, to a common destination page. Beware that this also replace the custom error 404 page, just because no more error 404 can be obtained from site calls. |
| Redirect URL | Text | Absolute URL where to redirect all the errors with a 301 return code (e.g. http://www.google.it). The URL is used only when "Redirect any error" option is set to Yes, and only if none of the enabled items match with the error URL (i.e. after redirect phase). A {siteurl} macro is also supported here. |
Advanced Plugin Parameters
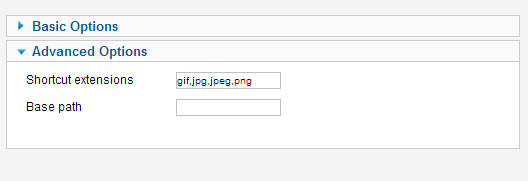
In the following table there’s a list of all advanced plugin parameters.
| Name | Value | Description |
|---|---|---|
| Shortcut extensions | Text | List of comma separated file extensions to drop on error page for 404 error (e.g. gif,jpg,jpeg,png). This can be useful, as example, to avoid the full redirect process for each call to a non-existing image. |
| Base path | Text | The web site base installation path (e.g. /myportal if the site's homepage is http://www.mysite.com/myportal). This string will be dropped from any request before to check redirection rules. This increase portability for configured items. Leave blank if the site is installed on the root. |
Installation procedure
ReDJ extension has just one package to download and install. The package includes a component and a plugin, and supports the installation with "upgrade" mode, so there’s no need any more to uninstall any previous version of ReDJ.
To install ReDJ, login to Joomla backend as administrator, and go to menu "Extensions manager". Click the browse button, select the package file (ReDJX.XCommunity.zip or ReDJX.XEnterprise.zip) and click the installation button.

That’s all. Now we are ready to start using ReDJ.
Upgrade procedure
When upgrading from a previous version of ReDJ, there is no need to first uninstall the old package. As mentioned earlier, ReDJ supports the "upgrade" mode for the installation, so it is enough to just install the new package over the old one, both component and plugin will be upgraded.
Note that during the upgrade also the database tables are upgraded when needed, but without to delete or loose any table data. It is in charge of the installation process to upgrade tables structure as needed. All the rules will be preserved.
CSLookup
CSLookup is a native Joomla plugin created for dynamically add a couple of drop down select list fields on any page and form for Country/State lookup. The Country list is automatically populated on page load, and when a user selects a Country from the dropdown list, the corresponding State dropdown list field will be automatically populated with the Country specific States. This can be used, as example, with JomSocial or Community Builder to add the Country/State lookup feature to the user profile form.

Usage is really simple! Just install the plugin from the Joomla! backend, enable it, and set the pages where you want to replace the Country and/or the State fields. The plugin can work on any form, it's sufficient that Country and State fields are "select" or "input" type (the select field can be initially empty), and have the HTML "id" attribute set. And this is not all!. If these fields have an initial value set, this value is automatically selected in the list created.

In the plugin settings there's a Page list text area, were each row can specify a page were replace the lookup fields. Each row MUST have the format parameters;countryid;stateid, where the parameters list MUST be in the format param1=value1,param2=value2,... (so a row example is option=com_community, view=register, task=registerProfile; field11; field9). If all parameters match, the lookup fields are created on the corresponding page, assuming that the select or input field with id "countryid" is the Country list, and the select or input field with id "stateid" is the State list. The plugin also support only the Country list, if the "stateid" is not specified.
Here is an example of how it works. In the form below, the Country and State fields are initially created with only one selected option using the following HTML code:
<form>
<table border="0">
<tbody>
<tr>
<td><select id="countrySelect" name="country"><option value="USA" selected="selected">USA</option></select></td>
<td><select id="stateSelect" name="state"><option value="Colorado" selected="selected">Colorado</option></select></td>
</tr>
</tbody>
</table>
</form>
And the plugin is configured to replace them on this page. Note that the initial values "USA" and "Colorado" are automatically selected.
CSLookup is released under GPL 2.0 license, and is available for download here.
