Displaying items by tag: configuration
Initial configuration
The first thing to do is to enable Tag Meta plugin. To enable the plugin go to menu "Extensions" -> "Plug-in Manager", find a system type plugin named "System - Tag Meta Community" or "System - Tag Meta Enterprise" in the plugin list, and click on it to access to plugin settings. Set "Status" to “Enabled”, and set other parameters on the right side according to your needs. Look at "Plugin settings" paragraph for detailed information about each parameter. Click on "Save & Close" button and check that the plugin is now enabled.

Remember that is the plugin that "does the work". The Tag Meta component is just the administrative interface for managing meta rules an other features, but is the plugin that checks site requests and performs meta enhancement when needed. So, the very first thing to do is to enable the plugin. Note that if you need to disable Tag Meta, just disable the plugin.
Another thing to check is the plugins order that can be very important, especially if there are some other plugins that mess with page's meta information. In most cases it is better to set Tag Meta as the last system plugin, so it will be the last to be executed and to madofy page content. Now Tag Meta is ready to work! You can now create your first meta rule, and test the result through the web browser. Be careful that you could get a cached page. To avoid this just clear server-side cache from backend (menu "Maintenance" -> "Clean Cache"), and client-side cache from your web browser.
Initial configuration
The first thing to do just after installation is to enable jBackend basic plugins. To do this go to menu "Extensions" -> "Plug-in Manager", and filter plugin list for type "jbackend".

Each one of these plugins has some configurable options, so it is enough to click on "Status" buttons to enable the plugins, but it is necessary to edit a plugin to change its settings.
Note that when a plugin is disabled the API functions it provides will NOT be available.
To start using jBackend it is a good practice to publish an "end-point". This is a Joomla menu item which provides a defined URL to access to jBackend APIs (the one associated with the menu link), and can be configured as needed using menu item's options. To create an end-point go to "Menus" -> "Menu Manager", click on the menu that will contain the end-point (or create a new menu, like an hidden menu) and add a new menu item.
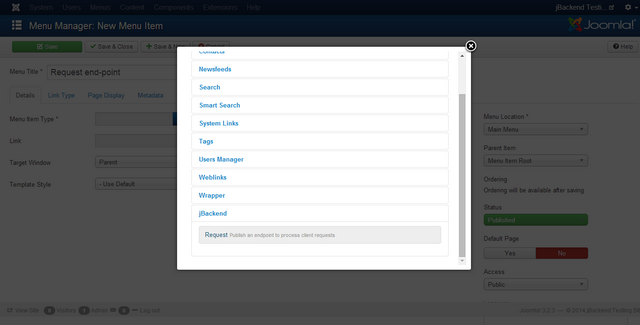
Select a menu type "jBackend" -> "Request" and set the "Access type" in the "Options" tab, and other options available for the current endpoint.
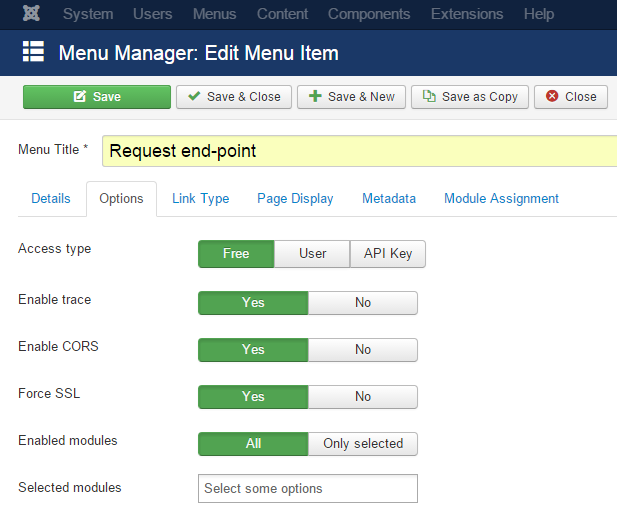
The following options are available for each endpoint:
| Option | Description |
| Access type | Specify the kind of access allowed by the endpoint. |
| Enable trace | Enable or disable the logging of each request made at this endpoint. |
| Enable CORS | Add Access-Control-Allow-Origin: * to the response header. |
| Force SSL | Redirect any request on http to the same request on https. |
| Enabled modules | Specify which modules to expose and make accessible on the endpoint (all modules or only selected modules). |
| Selected modules | The list of modules enabled on the endpoint. This option is applied only when "Enabled modules" is "Only selected". |
Currently jBackend supports the following access type:
| Access type | Description |
| Free | End-point can be consumed without any authentication or limitation, just like a guest user can browse the site's pages and with the same restrictions. This means that if an article is restricted to "Register users" only, it will be not accessible for guests even on the end-point, but the client needs to authenticate himself, using the login service. Native ACL are always satisfied with any access type and this should be respected also in case of custom module development. |
| User | End-point usage is restricted to authenticated users only. To consume services the first call must be to login service. If the user can login to the site, then the same credentials are authorized to use the end-point. |
| API Key | End-point needs a valid API Key for each request. The request must include the api_key=<KEY> parameter or it will be rejected. More details on API Key features can be found in the dedicated section. |
Note that APIs could be accessed without to publish any end-point, just calling the jBackend component with http://<siteurl>/index.php?option=com_jbackend&<params> (default requests). For this reasons there are global options defined as default and used for such situations. These general options can be accessed by the "Options" button in the jBackend panel. For security reasons the default access is set to "API Key".
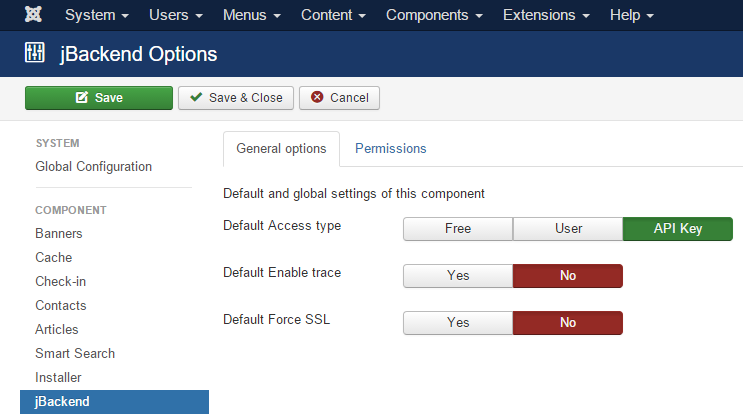
The following global options are available:
| Option | Description |
| Default Access type | Specify the kind of access allowed by the default endpoint. |
| Default Enable trace | Enable or disable the logging of each request made on the default endpoint. |
| Default Force SSL | Redirect any request on http to the same request on https on the default endpoint. |
REST format
If Joomla SEF is enabled, the endpoint can serve requests with the REST format (e.g. /get/content/articles/<N>).

Initial configuration
The first thing to do is to enable ReDJ plugin. To enable the plugin go to menu "Extensions" -> "Plug-in Manager", find a system type plugin named "System - ReDJ Community" or "System - ReDJ Enterprise" in the plugin list, and click on it to access to plugin settings. Set "Status" to “Enabled”, and set other parameters on the right side according to your needs. Look at "Plugin settings" paragraph for detailed information about each parameter. Click on "Save & Close" button and check that the plugin is now enabled.

Remember that is the plugin that "does the work". The ReDJ component is just the administrative interface for managing redirection rules an other features, but is the plugin that checks site requests and performs redirection and other actions when needed. So, the very first thing to do is to enable the plugin. Note that if you need to disable ReDJ, just disable the plugin.
Another thing to check is the plugins order that can be very important, especially if there are some other plugins that mess with the source URL, redirection and aliases. In most cases it is better to set ReDJ as the first system plugin, so it will be the first to be executed and to check any page call. Now ReDJ is ready to work! You can now create your first redirection rule, and test the redirection through the web browser. Be careful that you could get a cached page. To avoid this just clear server-side cache from backend (menu "Maintenance" -> "Clean Cache"), and client-side cache from your web browser.
The ErrorDocument directive
Some non-existing URLs are managed directly by Apache that returns the 404 error page.

To manage these URLs with ReDJ and make redirection it is necessary to tell to Apache to pass 404 errors to Joomla (and ReDJ). To do this, it is enough to append this directive at the end of Joomla standard .htaccess file:
ErrorDocument 404 /