
jBackend for Joomla 3.0 (24)
jBackend for Joomla 3.0
Introduction
Installation procedure
Initial configuration
Usage
Keys
Logs
Apps
Devices
Notifications
User Module API
Content Module API
Push Module API
Menu Module API
K2 Module API
SobiPro Module API
ZOO Module API
Kunena Module API
Search Module API
Community Builder Module API
Release System Module API
Error Codes
Developer's guide
Changelog
jBackend is a Joomla extension that introduces a set of APIs for access to all Joomla's content and features, and easily integrate any Joomla site with any external system. It extends the power of Joomla allowing you to use your site as a "backend system" to serve and feed any kind of client (mobile apps, news channels, affiliate sites, and any other external system).
jBackend also provides a full push notifications platform for iOS and Android mobile apps. It is possible to manage multiple apps, to register devices for each app, and to schedule push notifications sending on registered devices, filtered by app and platform type.
jBackend is designed to be "extensible" via plugins. Adding new plugins means to add new APIs to support new Joomla extensions. The basic package already includes three plugins, the User Module (that supports Joomla users and ACL), the Content Module (for the standard Joomla content, categories and articles), and the Push Module (to work with push notifications). New plugins are on the way, to add support for the most used Joomla extensions (e.g. K2, Zoo, VirtueMart, HikaShop, and so on). Additional plugins can be installed separately, so you can install and use only the necessary modules, and keep your CMS lightweight and efficient.
jBackend access is possible through an "end-point", that can be published like a menu item. It is possible to publish several end-points and configure access rules separately for each one. The access can be free, or restricted with a standard user login or through the use of an API Key. API Keys can be generated and configured (e.g. in terms of limitations like expiration or daily access) in jBackend panel. This allows full control on API access provided to clients.
It is possible to enable requests tracking for each endpoint separately. In this way all requests received from the endpoint are stored in the database and can be used for security audit or for statistical analysis.
It is also possible to enable specific modules for each endpoint separately. This increase the control level on the pool of functions or services to expose for each endpoint.
End-point channels can be accessed through HTTP, requests can be compliant to RESTful pattern, and responses are JSON encoded. In the future is expected to support the ability to provide XML responses.
jBackend basic extension has just one package to download and install. The package includes the component and three plugins (User Module, Content Module, and Push Module), and support the installation with "upgrade" mode, so there’s no need to uninstall any previous installed version.
To install jBackend, login to Joomla backend as administrator, and go to menu "Extension Manager". Click the browse button, select the package file (jBackendX.X_J3.zip) and click the installation button.

The package will be uploaded on the server and then installed. After installation finished a message will report a successful message.
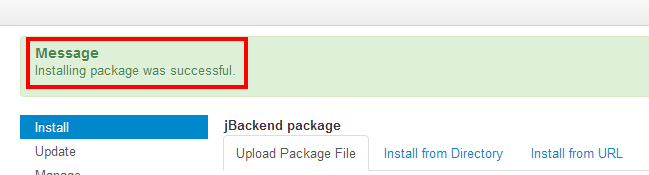
That’s all. Now we are ready to start using jBackend.
Upgrade procedure
When upgrading from a previous version of jBackend, there is no need to first uninstall the old package. As mentioned earlier, jBackend supports the "upgrade" mode for the installation, so is enough to just install the new package over the old one. The component and the three plugins included in the basic package will be upgraded.
Note that during the upgrade also the database tables are upgraded when needed, but without to delete or loose any table data. It is in charge of the installation process to upgrade tables structure if needed. All the data (e.g. API Keys) will be preserved.
The first thing to do just after installation is to enable jBackend basic plugins. To do this go to menu "Extensions" -> "Plug-in Manager", and filter plugin list for type "jbackend".

Each one of these plugins has some configurable options, so it is enough to click on "Status" buttons to enable the plugins, but it is necessary to edit a plugin to change its settings.
Note that when a plugin is disabled the API functions it provides will NOT be available.
To start using jBackend it is a good practice to publish an "end-point". This is a Joomla menu item which provides a defined URL to access to jBackend APIs (the one associated with the menu link), and can be configured as needed using menu item's options. To create an end-point go to "Menus" -> "Menu Manager", click on the menu that will contain the end-point (or create a new menu, like an hidden menu) and add a new menu item.
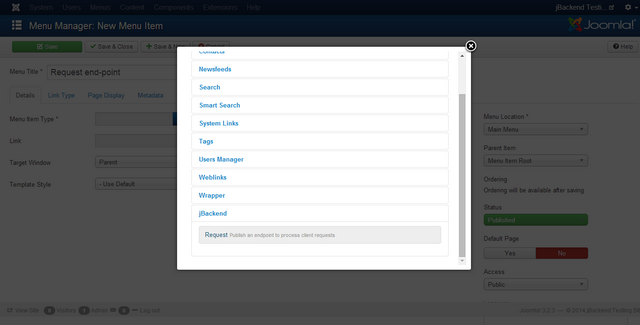
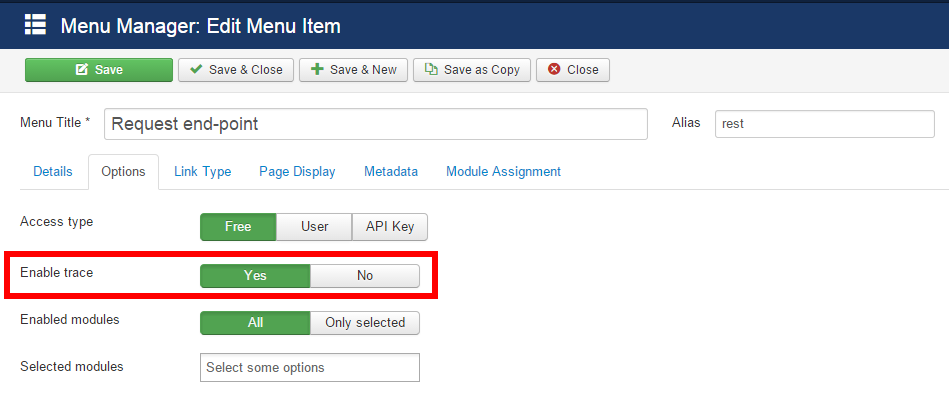
Select a menu type "jBackend" -> "Request" and set the "Access type" in the "Options" tab, and other options available for the current endpoint.
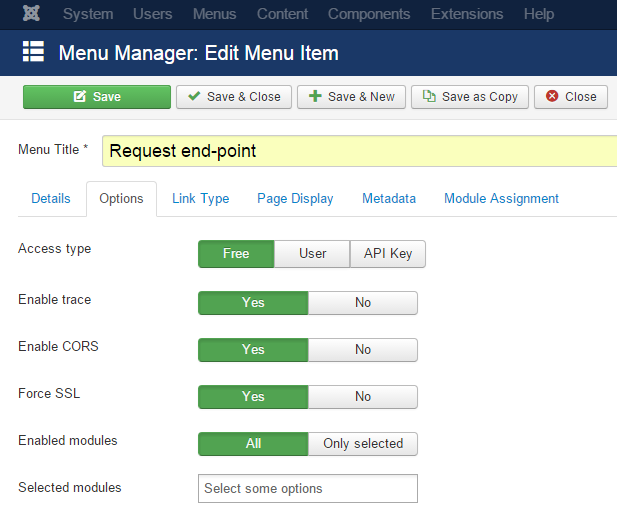
The following options are available for each endpoint:
| Option | Description |
| Access type | Specify the kind of access allowed by the endpoint. |
| Enable trace | Enable or disable the logging of each request made at this endpoint. |
| Enable CORS | Add Access-Control-Allow-Origin: * to the response header. |
| Force SSL | Redirect any request on http to the same request on https. |
| Enabled modules | Specify which modules to expose and make accessible on the endpoint (all modules or only selected modules). |
| Selected modules | The list of modules enabled on the endpoint. This option is applied only when "Enabled modules" is "Only selected". |
Currently jBackend supports the following access type:
| Access type | Description |
| Free | End-point can be consumed without any authentication or limitation, just like a guest user can browse the site's pages and with the same restrictions. This means that if an article is restricted to "Register users" only, it will be not accessible for guests even on the end-point, but the client needs to authenticate himself, using the login service. Native ACL are always satisfied with any access type and this should be respected also in case of custom module development. |
| User | End-point usage is restricted to authenticated users only. To consume services the first call must be to login service. If the user can login to the site, then the same credentials are authorized to use the end-point. |
| API Key | End-point needs a valid API Key for each request. The request must include the api_key=<KEY> parameter or it will be rejected. More details on API Key features can be found in the dedicated section. |
Note that APIs could be accessed without to publish any end-point, just calling the jBackend component with http://<siteurl>/index.php?option=com_jbackend&<params> (default requests). For this reasons there are global options defined as default and used for such situations. These general options can be accessed by the "Options" button in the jBackend panel. For security reasons the default access is set to "API Key".
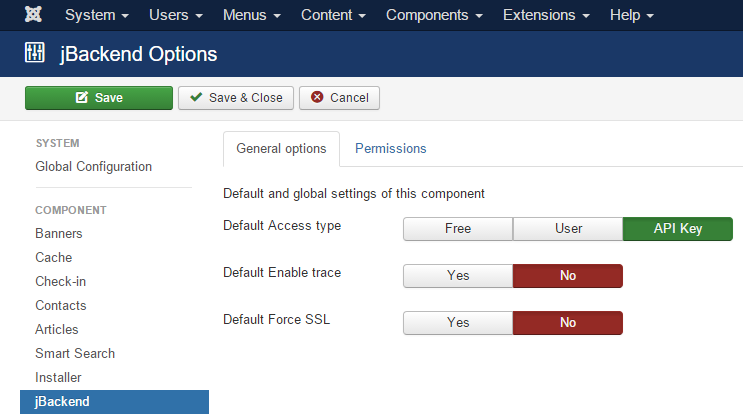
The following global options are available:
| Option | Description |
| Default Access type | Specify the kind of access allowed by the default endpoint. |
| Default Enable trace | Enable or disable the logging of each request made on the default endpoint. |
| Default Force SSL | Redirect any request on http to the same request on https on the default endpoint. |
REST format
If Joomla SEF is enabled, the endpoint can serve requests with the REST format (e.g. /get/content/articles/<N>).

To manage API Keys used to grant access to end-points go to menu Components > jBackend > Keys. A list of jBackend Keys will be shown:

Each key has the following properties:
| Field: | Description: |
|---|---|
| Key | The enabling key |
| User | The user associated to this key (to restrict access with key and to a single user) |
| Enabled endpoints | If this key is enable on ALL endpoints or ONLY on selected endpoints |
| Selected endpoints | The endpoints for which the key is enabled, when not enabled for ALL |
| Enabled on default | If the key should also work on the default requests (i.e. /index.php?option=com_jbackend&view=request&...) |
| Daily requests | Maximum number of daily requests allowed for the key (0 means unlimited) |
| Expiration date | Key expiration date (0000-00-00 00:00:00 means never expires) |
| Comment | Just a reminder for the key |
For each key the following statistics fields are available:
| Field: | Description: |
|---|---|
| Hits | Number of times the key was used |
| Last visit | Last time the key was used |
| Current day | Current day for daily requests limit |
| Current hits | Hits of current day for daily requests limit |
The API key, when required by the endpoint, must be included in any request using one of the following methods:
- Adding api_key=<KEY> to the query params (for GET requests);
- Adding api_key=<KEY> to the payload (for POST requests);
- Adding api_key: <KEY> to the JSON payload (for JSON POST requests);
- Adding Authorization: api_key <KEY> to the headers (in any case).
To access to configured notifications go to menu Components > jBackend > Notifications. A list of notifications will be shown:

Each notification has the following information:
| Field: | Description: |
|---|---|
| Title | Notification title (used only on Android) |
| Message | Notification message |
| Payload | Payload of push notification for app (JSON format) |
| App | App code |
| Platform | OS platform |
| Target | Target registered devices for the push notification (All, Selected users, Selected groups, Selected devices) |
| Target Users | Users whose registered devices are target for the push notification |
| Target Groups | Groups whose registered devices are target for the push notification |
| Target Devices | Registerd devices target of the push notification |
| Context | Application specific notification context. Not used yet (it will be used to filter recipients for push notifications) |
| Scheduled time | Time scheduled to start sending out this notification on devices |
| Status | Current sending status for this notification |
| Last run | Last time this notification queue has been executed |
| Last device ID | Device ID of the last notification sent in the last run |
The Status of a notification can be:
| Status: | Description: |
|---|---|
| aborted (-2) | The notification is "logically" deleted (in this state the notification is always skipped) |
| paused (-1) | The notification is suspended (in this state the notification is always skipped) |
| scheduled (0) | The notification is ready to be sent (sending will start at the scheduled time) |
| running (1) | The notification is currently being processed |
| completed (2) | The notification has been sent to all devices (job completed) |
Using the buttons on the toolbar it is possible to change the status of selected notifications. It is also possible to "unlock" locked notifications. It could be useful, as example, when a notification is locked for too long, which could mean there was a problem on the scheduler and the resource was not released properly (see How notification sending works)
How notification sending works
To start processing the pending notifications (with status scheduled and running) it is necessary to call a "trigger" function. The Push Module has a scheduler function that must be called on a regular basis (e.g. from a crontab) to trigger the sending of scheduled push notifications.
Scheduler logic
Each time the scheduler function is called, it select all pending notifications ordered by the scheduler time ascending (first the notification scheduled before). To be "pending" a notification must have a scheduled time less then current time, must be in status scheduled or running, and must be no locked (locked means the notification is currently in charge of another scheduler). If the pending list is not empty, the scheduler starts to process notifications once a time, until the total number of push notifications sent to devices reach the Batch size (max configured for the scheduler).
For the notification currently being processed, the scheduler first locks it, then start to send the notifications to all matching devices (sorted by device ID, so all devices will be checked only once, including new devices added while the notification is running) until the Batch size is reached or the devices are finished. In the first case the notification is unlocked and the scheduler ends. In the second case the notification state is set to completed, it is unlocked and the scheduler starts to process the next notification (if one) with the same rules.
With this processing logic it is possible to schedule and execute concurrent schedulers to increase volume of push notifications sent.
Push notification payload
It is possible to send a custom payload with each push notification. The payload must be a valid JSON, example:
{
  "alert": {
    "alertId": "1404999843555",
    "alertStatus": false
  }
}
Or:
{
  "id": "25"
}
How to get the JSON payload in the mobile app depends on the framework used. The following is an example using Ionic Framework with this Cordova Push notification plugin:
https://github.com/phonegap-build/PushPlugin
Android GCM
In the jBackend push plugin the payload hasthe following structure:
    $payload = array(
      'title'      => $notification['title'],
      'message'    => $notification['message'],
      'icon'       => 'icon',
      'data'       => $notification['payload']
    );
On the mobile app the push callback has the following code:
    window.onNotificationGCM = function(e) {
        switch (e.event) {
            case 'registered':
                if (e.regid.length > 0) {
                    $rootScope.$emit('push.registered', { 'token': e.regid });
                }
                break;
            case 'message':
                // Notification in foreground
                if (e.foreground) {
                    $log.debug('push notification in foreground');
                } else {
                    $log.debug('push notification in background');
                }
                $log.debug('push message payload ' + JSON.stringify(e.payload));
                $rootScope.$emit('push.received', { 'payload': e.payload.data });
                // e.payload.data is { "id": "25" }
                break;
            case 'error':
                $log.debug('push GCM error ' + e.msg);
                break;
            default:
                $log.debug('push GCM unknown event');
                break;
        }
    };
Apple APNs
In the jBackend push plugin the payload hasthe following structure:
    $body = array(
      'aps' => array(
          'alert' => array(
              'title' => $notification['title'],
              'body' => $notification['message']
          ),
          'sound' => 'default'
      ),
      'data' => $notification['payload']
    );
On the mobile app the push callback has the following code:
    window.onNotificationAPN = function(e) {
        if (e.alert) {
            $log.debug('push APN alert ' + e.alert);
        }
        if (e.sound) {
            $log.debug('push APN sound');
        }
        if (e.badge) {
            $log.debug('push APN badge ' + e.badge);
            pushNotification.setApplicationIconBadgeNumber(successBadgeHandler, errorBadgeHandler, e.badge);
        }
        $log.debug('push APN full event ' + JSON.stringify(e));
        $rootScope.$emit('push.received', JSON.parse(e.data));
        // e.data is { "id": "25" }
    };
To access to the list of registered devices go to menu Components > jBackend > Devices. A list of mobile devices will be shown:

It is not possible to add or edit device manually. Device registration is performed through a request to the Push Module.
Each registered device has the following information:
| Field: | Description: |
|---|---|
| Token | Device Token |
| App | App code |
| Platform | OS platform |
| IOS Alert | App setting desired about alert on iOS (an optional registration param for the app) |
| IOS Badge | App setting desired about badge on iOS (an optional registration param for the app) |
| IOS Sound | App setting desired about sound on iOS (an optional registration param for the app) |
In the current version alert, badge and sound fields are not used yet. They will be used in future, as example, to filter target devices for push notification sending.
For each device the following statistics fields are available:
| Field: | Description: |
|---|---|
| Hits | Number of times the device has registered |
| Last visit | Last time the device has registered |
| Push hits | Number of push notifications sent to device |
| Last push | Last time a push notification has been sent to device |
To access to configured apps go to menu Components > jBackend > Apps. A list of mobile apps will be shown:

Each registered app has the following information:
| Field: | Description: |
|---|---|
| Code | The application unique code (it will be converted in lowercase) |
| Description | An arbitrary description for the application |
| Project ID | Google Project ID |
| Project number | Google Project number (it will be used as Sender ID) |
| API key | Google API key |
| SSL certificate | Apple SSL certificate |
| Password | Password for Apple SSL certificate |
SSL Certificate
The SSL certificate for APNs must be in PEM format, and must include the certificate and the private key. If the private key is not protected by password, the password field must be empty.
Here is an example of the PEM certificate:
-----BEGIN CERTIFICATE-----
MIIFjDCCBHSgAwIBAgIIAYymZoETLVYwDQYJKoZIhvcNAQEFBQAwgZYxCzAJBgNV
BAYTAlVTMRMwEQYDVQQKDApBcHBsZSBJbmMuMSwwKgYDVQQLDCNBcHBsZSBXb3Js
ZHdpZGUgRGV2ZWxvcGVyIFJlbGF0aW9uczFEMEIGA1UEAww7QXBwbGUgV29ybGR3
aWRlIERldmVsb3BlciBSZWxhdGlvbnMgQ2VydGlmaWNhdGlvbiBBdXRob3JpdHkw
...
Nw2VqrNGWt42Jwt66015Ww+Toh5KaTisMJnR/UQsDOWErVUkmZBbrVkbIy/hhTYZ
b/MJRYBvnAQEtNU08eac3aqOEUFBt/Uu/HUigfvkxXOUdwMW4+wEB3uR2cLghrcA
XvVMho17NIY9rXy3bEIuzwDTUFoCOfBEBYqW00BJVTGkOa6EWDI7SZbuULtxlByD
4edJl4ukCdZrJaTfHWMPeGqnv+MIrxz6LNSeiulTyQw=
-----END CERTIFICATE-----
-----BEGIN RSA PRIVATE KEY-----
Proc-Type: 4,ENCRYPTED
DEK-Info: DES-EDE3-CBC,D20C57B1444E286C

uWXgF5I7fBBv2vY4N0yXiF9Uar+BRilhLUEuAcwDJJhWCFvnxVuBerck68Z5Zcbf
JNJlESBp7exD5sTgNfok12bRw9cXvhMibY70riCukfhJveSWXCYIgN9BYtUjZgdn
u8FZLtuRQH+HqY9OEjfQ9bcAiRX2a4uL1rKGCnyZShyWMRAtjLrOvT6Lzm8D59l6
7u8JcGlRAw+bdpDntwmB+17ep0zYd19uNRR5x9YKQfn9b55z1FiS+cBvwqqxnEtK
...
jNqc19lOabQjkmCPzJjUVeaR/7pco2pGhNoA9UpK9kgL82yuj4Vo/+VYbSw1a+/d
NkNKwOQTLttvKihEWDIZchoNP4vB/QnBo1DOAf+LRhtS3ja/FnLvsIouVeHo4OTL
NqJKpw2FLJUY2cxxfu0rVID6motRsSwR4vZ3RYoFf7lA9nQpWtaCDgxoohuFF4Jp
q+j5ZfY1MI0zQV56BnowR/0ocgzoibd6x3hTl076MGikjI6++Go6ng==
-----END RSA PRIVATE KEY-----
To access to end-points access logs go to menu Components > jBackend > Logs. A list of traced requests will be shown:

Each logged request has the following information:
| Field: | Description: |
|---|---|
| Endpoint | The ID of the end-point that has received the request |
| Access type | The type of access used on the end-point (free, user, API key) |
| Request time | The date and time of the request |
| Duration | Time required to serve the request (in seconds) |
| Error code | The error code in case of request error |
| User ID | The ID of the user when available |
| Key | The API key used when available |
| Action | The action of the request |
| Module | The module of the request |
| Resource | The resource of the request |
It is possible to enable log trace for each end-point from the menu item options:
Once an end-point is published the web clients can start to make HTTP requests and consume services provided by jBackend API. It is possible to test if all is working as expected using any REST client that allows to build custom HTTP requests (much better if the client supports JSON decode to better show server responses). Some good clients are available as browser plugin for both Firefox and Chrome. We suggest REST Easy for Firefox and Postman - REST Client for Chrome.
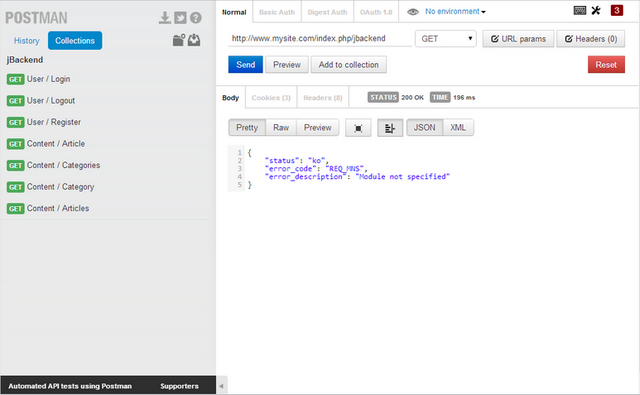
Let's assume the end-point menu item can be accessed with the following URL:
http://www.mysite.com/index.php/jbackend
Calling just the URL without any parameter we will get the following JSON response:
{
    "status": "ko",
    "error_code": "REQ_MNS",
    "error_description": "Module not specified"
}
Note that the HTTP Response Code is always 200 even in case of errors. The error condition is reported by the "status" value (ok, ko). Additional information about the error can be found in the "error_code" and the "error_description" values.
To check jBackend features it is available a sandbox with the last version of jbackend and all modules installed, and free access type on the end-point. To play with the sandbox a Postman collection is available to download here:
http://www.selfget.com/downloads/file/41-jbackapp-postman-collection.html
It needs only to be imported into Postman and is ready to play.
Push Notifications
jBackend includes a fully featured platform for sending Push Notifications over Google GCM (Android) and Apple APNs (iOS). Moreover, it supports multiple mobile applications, and you can manage them all from a single Joomla installation.
The component interface includes functions to manage Apps, Devices and Notifications, and there's a Push module to interact with jBackend from the outside (e.g. to send registration token from your app or start the push notification sending process).
More...
The User Module is implemented with the plg_jbackend_user plugin. It provides functions related to Joomla users and ACL. Here is the list of supported methods.
User login
Request parameters
action=post
module=user
resource=login
username=<username>
password=<password>
Example
<end-point>?action=post&module=user&resource=login&username=<username>&password=<password>
Example (REST format)
<end-point>/post/user/login?username=<username>&password=<password>
Response
{
    "status": "ok",
    "userid": <userid>,
    "username": "<username>",
    "session_id": "<session_id>"
}
User logout
Request parameters
action=get
module=user
resource=logout
Example
<end-point>?action=get&module=user&resource=logout
Example (REST format)
<end-point>/get/user/logout
Response
{
    "status": "ok"
}
User registration
Request parameters
action=post
module=user
resource=register
username=<username>
password=<password>
email=<email>
firstname=<firstname>
lastname=<lastname>
Example
<end-point>?action=post&module=user&resource=register&username=<username>&password=<password>&email=<email>&firstname=<firstname>&lastname=<lastname>
Example (REST format)
<end-point>/post/user/register?username=<username>&password=<password>&email=<email>&firstname=<firstname>&lastname=<lastname>
Response
{
    "status": "ok"
}
User remind
Sends an email to the user's account with a password remind link.
Request parameters
action=get
module=user
resource=remind
email=<email>
Example
<end-point>?action=get&module=user&resource=remind
Example (REST format)
<end-point>/get/user/remind
Response
{
    "status": "ok"
}
User reset
Sends an email to the user's account with a password reset link.
Request parameters
action=get
module=user
resource=reset
email=<email>
Example
<end-point>?action=get&module=user&resource=reset
Example (REST format)
<end-point>/get/user/reset
Response
{
    "status": "ok"
}
User profile
Request parameters
action=get
module=user
resource=profile
Example
<end-point>?action=get&module=user&resource=profile
Example (REST format)
<end-point>/get/user/profile
Response
{
    "status": "ok",
    "fields": [
        {
            "id": "<id>",
            "title": "<title>",
            "name": "<name>",
            "language": "<language>",
            "type": "<type>",
            "default_value": "<default value>",
            "context": "<context>",
            "group_id": "<group id>",
            "label": "<label>",
            "description": "<description>",
            "required": "<required>",
            "language_title": "<language title>",
            "language_image": "<language image>",
            "group_title": "<group title>",
            "value": "<value>",
            "rawvalue": "<raw value>"
        },
        ...
    ],
    "_errors": [<_errors>],
    "groups": {
        "<groupid>": "<groupid>"
        ...
    },
    "id": "<id>",
    "name": "<name>",
    "username": "<username>",
    "email": "<email>",
    "block": "<block>",
    "sendEmail": "<sendEmail>",
    "registerDate": "<registerDate>",
    "lastvisitDate": "<lastvisitDate>",
    "activation": "<activation>",
    "params": {
        "admin_style": "<admin_style>",
        "admin_language": "<admin_language>",
        "language": "<language>",
        "editor": "<editor>",
        "helpsite": "<helpsite>",
        "timezone": "<timezone>"
    },
    "lastResetTime": "<lastResetTime>",
    "resetCount": "<resetCount>",
    "otpKey": "<otpKey>",
    "otep": "<otep>",
    "requireReset": "<requireReset>",
    "tags": {
        "typeAlias": <typeAlias>,
        "tags": "<tags>"
    }
}
User profile update
Allows to update the user profile (user must be authenticated). The requests must use the POST method with a JSON payload.
Request parameters
action=put
module=user
resource=profile
Example
POST <end-point>?action=put&module=user&resource=profile
Example (REST format)
POST <end-point>/put/user/profile
JSON payload data:
{
    "name": "<name>",
    "username": "<username>",
    "password": "<password>",
    "email": "<email>",
    "profile": {
        "city": "<city>"
        ...
    },
    "com_fields": {
        "field-1": "<value 1>",
        "field-2": "<value 2>"
        ...
    }
}
Response
{
    "status": "ok"
}
User status
Allows to check the current status of the user (guest or logged in), and provides some additional information.
Request parameters
action=get
module=user
resource=status
Example
<end-point>?action=get&module=user&resource=status
Example (REST format)
<end-point>/get/user/status
Response
{
    "status": "ok",
    "is_guest": <0 or 1>,
    "user_id": "<user_id>",
    "session_id": "<session_id>",
    "session_expire": <session_expire>
}
Plugin Settings

The following options are available for user plugin:
| Option | Description |
| Auto activate | Automatically activate users on registration and skip any notification email. |
| Extended auth request | Process register, remind and reset as an authentication request (i.e. these requests can bypass the access restrictions on the endpoint). |
| Extended fields | Enable support for additional fields in the registration. |
| External libraries | List of paths (relative to JPATH_SITE) of external libraries to load in the registration (one path each row). |
| Required fields | List of fields to include in the response for profile requests (when blank it returns all fields). Fields must be separated by commas and square brackets for nested fields (e.g. id,name,username,profile[city,region,country]). |
| JSON Login | Enable JSON payload on login action. |
| JSON Register | Enable JSON payload on register action. |
| Enable session id | When enabled it overrides cookie based session with session_id parameter. This is useful when it is not possible to rely on cookie based session. This parameter can be passed as GET/POST param or as JSON field when JSON payload is enabled for the current request. |
The Content Module is implemented with the plg_jbackend_content plugin. It provides functions related to Joomla content (articles and categories). Here is the list of supported methods.
Get the list of categories
Request parameters
action=get
module=content
resource=categories
rootid=<R> (optional)
recursive=<true or 1> (optional)
countitems=<true or 1> (optional)
Example
<end-point>?action=get&module=content&resource=categories&rootid=<R>&recursive=<false>&countitems=<0>
Example (REST format)
<end-point>/get/content/categories?rootid=<R>
Response
{
    "status": "ok",
    "total": <T>,
    "categories": [
        {
            "id": "<category id>",
            "title": "<category title>",
            "description": "<category description>",
            "parent_id": "<parent category id>",
            "numitems": <items count>
        },
        ...
        {
            "id": "<category id>",
            "title": "<category title>",
            "description": "<category description>",
            "parent_id": "<parent category id>",
            "numitems": <items count>
        }
    ]
}
Notes
If rootid is specified, starts to get subcategories from the specified category id instead of the root category. If recursive is true or 1, get categories and all subcategories, otherwise get only one level (default). If countitems is true or 1, return the number of articles of each category, otherwise do not return this information (default). Category id can be "root" for root node.
Get a category
Request parameters
action=get
module=content
resource=categories
id=<N>
Example
<end-point>?action=get&module=content&resource=categories&id=<N>
Example (REST format)
<end-point>/get/content/categories/<N>
Response
{
    "status": "ok",
    "id": "<category id>",
    "title": "<category title>",
    "alias": "<category alias>",
    "description": "<category description>",
    "metadesc": "<meta description>",
    "metakey": "<meta keywords>",
    "metadata": {
        "page_title": "<meta title>",
        "author": "<meta author>",
        "robots": "<meta robots>"
    },
    "language": "<language code>",
    "parent_id": "<category id>",
    "level": "<category level>",
    "numitems": "<N>"
}
Notes
Language can be "*" if any. Category id can be "root" for root node.
Get the list of articles
Request parameters
action=get
module=content
resource=articles
catid=<C> (optional)
maxsubs=<S> (optional)
featured=<F> (optional)
limit=<L> (optional)
offset=<O> (optional)
orderby=<field> (optional)
orderdir=<dir> (optional)
Example
<end-point>?action=get&module=content&resource=articles&catid=<C>&maxsubs=<S>&featured=<F>&orderby=<id>
Example (REST format)
<end-point>/get/content/articles?catid=<C>&limit=<L>&offset=<O>
Response
{
    "status": "ok",
    "total": <total articles>,
    "limit": <pagination limit>,
    "offset": <pagination offset>,
    "pages_current": <current page>,
    "pages_total": <total pages>,
    "articles": [
        {
            "id": "<article id>",
            "title": "<article title>",
            "alias": "<article alias>",
            "featured": "<featured>",
            "content": "<article content>",
            "catid": "<article category id>",
            "images": {
                "image_intro": "<image_url_for_intro>",
                "float_intro": "<float_side_for_intro>",
                "image_intro_alt": "<alt_text_for_intro>",
                "image_intro_caption": "<caption_for_intro>",
                "image_fulltext": "<image_url_for_fulltext>",
                "float_fulltext": "<float_side_for_fulltext>",
                "image_fulltext_alt": "<alt_text_for_fulltext>",
                "image_fulltext_caption": "<caption_for_fulltext>"
            },
            "tags": [
                {
                    "id": "<tag id>",
                    "title": "<tag title>",
                    "alias": "<tag alias>",
                    "language": "<tag language>"
                },
                ...
            ],
            "fields": [
                {
                    "id": "<field id>",
                    "title": "<field title>",
                    "name": "<field name>",
                    "type": "<field type>",
                    "default_value": "<default value>",
                    "group_id": "<field group id>",
                    "label": "<field label>",
                    "description": "<field description>",
                    "required": "<field required>",
                    "value": "<field value>",
                    "rawvalue": "<field raw value>"
                },
                ...
            ],
            "metakey": "<meta keywords>",
            "metadesc": "<meta description>",
            "metadata": {
                "robots": "<meta robots>",
                "author": "<meta author>",
                "rights": "<meta content rights>",
                "xreference": "<meta external reference>"
            },
            "language": "<language code>",
            "category_title": "<category title>",
            "category_alias": "<category alias>",
            "author": "<article author>",
            "created_date": "<created date>",
            "modified_date": "<modified date>",
            "published_date": "<publish up date>",
            "unpublished_date": "<publish down date>",
            "state": "<article state>"
            },
            ...
            {
                ...
            }
    ]
}
Notes
State:
- Published = 1,
- Unpublished = 0,
- Archived = 2,
- Trashed = -2
Max subs:
Number of subcategories to include (default 0=none)
Featured:
hide,only,show (default)
Order by:
id, title, alias, catid, state, created, created_by, ordering (default), hits
Order dir:
asc (default), desc
Dates are in ISO 8601 format (e.g 2017-05-11T10:16:32+00:00)
Property content is present only if plugin's option Content in article list is set.
Property tags is present only if plugin's option Add tags in article list is set.
Property fields is present only if plugin's option Prepare content in article list is set.
Get an article
Request parameters
action=get
module=content
resource=articles
id=<N>
Example
<end-point>?action=get&module=content&resource=articles&id=<N>
Example (REST format)
<end-point>/get/content/articles/<N>
Response
{
    "status": "ok",
    "id": "<article id>",
    "title": "<article title>",
    "alias": "<article alias>",
    "featured": "<featured>",
    "introtext": "<article intro text>",
    "content": "<article content>",
    "content_raw": "<article content raw>",
    "catid": "<article category id>",
    "images": {
        "image_intro": "<image_url_for_intro>",
        "float_intro": "<float_side_for_intro>",
        "image_intro_alt": "<alt_text_for_intro>",
        "image_intro_caption": "<caption_for_intro>",
        "image_fulltext": "<image_url_for_fulltext>",
        "float_fulltext": "<float_side_for_fulltext>",
        "image_fulltext_alt": "<alt_text_for_fulltext>",
        "image_fulltext_caption": "<caption_for_fulltext>"
    },
    "tags": [
        {
            "id": "<tag id>",
            "title": "<tag title>",
            "alias": "<tag alias>",
            "language": "<tag language>"
        },
        ...
    ],
    "associations": [
    ],
    "event": {
        "afterDisplayTitle": "<after display title>",
        "beforeDisplayContent": "<before display content>",
        "afterDisplayContent": "<after display content>"
    },
    "fields": [
        {
            "id": "<field id>",
            "title": "<field title>",
            "name": "<field name>",
            "type": "<field type>",
            "default_value": "<default value>",
            "group_id": "<field group id>",
            "label": "<field label>",
            "description": "<field description>",
            "required": "<field required>",
            "value": "<field value>",
            "rawvalue": "<field raw value>"
        },
        ...
    ],
    "cck_fields": [
    ],
    "metakey": "<meta keywords>",
    "metadesc": "<meta description>",
    "metadata": {
        "robots": "<meta robots>",
        "author": "<meta author>",
        "rights": "<meta content rights>",
        "xreference": "<meta external reference>"
    },
    "language": "<language code>",
    "category_title": "<category title>",
    "category_alias": "<category alias>",
    "author": "<article author>",
    "parent_id": "<parent id>",
    "parent_title": "<parent title>",
    "parent_alias": "<parent alias>",
    "parent_route": "<parent route>",
    "created_date": "<created date>",
    "modified_date": "<modified date>",
    "published_date": "<publish up date>",
    "unpublished_date": "<publish down date>",
    "version": "<article version>",
    "hits": "<article hits>",
    "rating": "<article rating>",
    "rating_count": "<article rating count>",
    "state": "<article state>"
}
Notes
State:
- Published = 1,
- Unpublished = 0,
- Archived = 2,
- Trashed = -2
Dates are in ISO 8601 format (e.g 2017-05-11T10:16:32+00:00)
Language can be "*" if any.
Property content_raw is present only if plugin's option Include content raw is set.
Property event is present only if plugin's option Show article event is set.
Property cck_fields is present only if plugin's option Include CCK is set.
Get the list of articles by tag id
Request parameters
action=get
module=content
resource=tagarticles
tagid=<T1,T2,...,Tn>
limit=<L> (optional)
offset=<O> (optional)
Example
<end-point>?action=get&module=content&resource=tagarticles&tagid=<T>&limit=<L>&offset=<O>
Example (REST format)
<end-point>/get/content/tagarticles?tagid=<T>&limit=<L>&offset=<O>
Response
{
    "status": "ok",
    "total": <total articles>,
    "limit": <pagination limit>,
    "offset": <pagination offset>,
    "pages_current": <current page>,
    "pages_total": <total pages>,
    articles: [
        {
            "id": "<article id>",
            "title": "<article title>",
            "alias": "<article alias>",
            "featured": "<featured>",
            "content": "<article content>",
            "images": {
                "image_intro": "<image_url_for_intro>",
                "float_intro": "<float_side_for_intro>",
                "image_intro_alt": "<alt_text_for_intro>",
                "image_intro_caption": "<caption_for_intro>",
                "image_fulltext": "<image_url_for_fulltext>",
                "float_fulltext": "<float_side_for_fulltext>",
                "image_fulltext_alt": "<alt_text_for_fulltext>",
                "image_fulltext_caption": "<caption_for_fulltext>"
            },
            "tags": [
                {
                    "id": "<tag id>",
                    "title": "<tag title>",
                    "alias": "<tag alias>",
                    "language": "<tag language>"
                },
                ...
            ],
            "metadesc": "<meta description>",
            "metakey": "<meta keywords>",
            "metadata": {
                "robots": "<meta robots>",
                "author": "<meta author>",
                "rights": "<meta content rights>",
                "xreference": "<meta external reference>"
            },
        "category_title": "<category title>",
        "author": "<article author>",
        "published_date": "<article date>"
        },
        ...
        {
            ...
        }
    ]
}
Notes
Dates are in ISO 8601 format (e.g 2017-05-11T10:16:32+00:00)
Get an article by alias
Request parameters
action=get
module=content
resource=articlebyalias
id=<alias>
Example
<end-point>?action=get&module=content&resource=articlebyalias&id=<alias>
Example (REST format)
<end-point>/get/content/articlebyalias/<alias>
Response
Same response as "Get an article"
Notes
Same notes as "Get an article".
Plugin Settings

The following options are available for user plugin:
| Option | Description |
| Filter language | Filter content by language. |
| Status | Filter content by state. |
| Access archived articles | Allow get article on archived items. |
| Grant access | Skip access permissions check and allow access to articles. |
| Full image URL | Generate absolute URL (i.e. with domain) for images fields. |
| Force full image URL in content | Try to replace relative image URL in content with absolute URL. |
| Add tags in article list | Include article tags in the list of articles. |
| Prepare content in article list | Call onContent events on each article in the list of articles. |
| Content in article list | Include full content in the list of articles. |
| Show article event | Include results of events in the article response. |
| Include content raw | Include raw content (no content plugin) in the article response. |
| Include CCK | Include SEBLOD CCK custom fields in the article response. |
The Push Module is implemented with the plg_jbackend_push plugin. It provides functions related to mobile push notifications for iOS and Android. Here is the list of supported methods.
Register
The register function must be called by mobile apps each time they get a notification token from the push service (e.g. APNs or FCM) to register the device on jBackend. Registration is needed to send push notifications to the app on the registered device.
Request parameters
action=put
module=push
resource=register
token=<token>
appcode=<appcode>
platform=<platform>
user_id=<user_id> (optional)
user_email=<user_email> (optional)
ios_alert=<true or 1> (optional)
ios_badge=<true or 1> (optional)
ios_sound=<true or 1> (optional)
Example
<end-point>?action=put&module=push&resource=register&token=<token>&appcode=<appcode>&platform=ios
Example (REST format)
<end-point>/put/push/register?token=<token>&appcode=<appcode>&platform=android
Response
{
    "status": "ok",
    "token": "<token>",
    "appcode": "<appcode>",
    "platform": "<generic|android|ios>",
    "platform_code": <platform_code>,
    "app_id": "<app_id>",
    "device_id": <device_id>,
    "ios_alert": <0|1>,
    "ios_badge": <0|1>,
    "ios_sound": <0|1>
}
Notes
Supported platform codes are 0=Generic, 1=Android, 2=iOS.
It is possible to associate an existing Joomla user to the device with the user_id param. If the plugin option Require user email is enabled, it is also needed to include the user_email field, and the email must match with the registered email address for the user with the specified user_id.
On iOS platform the app can also send (optionally) its notification settings for alert (ios_alert), badge (ios_badge), and sound (ios_sound). These values can be used to filter target devices when sending push notifications from jBackend.
Scheduler
The scheduler function must be called on a regular basis (e.g. from a crontab) to trigger the sending of scheduled push notifications.
Request parameters
action=get
module=push
resource=scheduler
Example
<end-point>?action=get&module=push&resource=scheduler
Example (REST format)
<end-point>/get/push/scheduler
Response
{
    "status": "ok",
    "batch_size": <N>,
    "sent": <T>,
    "success": <S>,
    "failure": <F>
}
Notes
Sent is the total number of processed notifications.
Notifications
This function allows to create a push notification programmatically (i.e. add a notification to the queue).
Request parameters
action=post
module=push
resource=notifications
title=<title>
message=<message>
app_code=<app_code>
platform=<platform>
target=<target>
target_users=<target_users>
target_groups=<target_groups>
target_devices=<target_devices>
scheduled_time=<scheduled_time>
payload=<payload> (optional)
context=<context> (optional)
auth_token=<auth_token> (optional)
Example
<end-point>?action=post&module=push&resource=notifications&title=<title>&message=<message>&app_code=<code>&platform=1&target=0&scheduled_time=2016-11-13%2000:15:31
Example (REST format)
<end-point>/post/push/notifications?title=<title>&message=<message>&app_code=<code>&platform=1&target=0&scheduled_time=2016-11-13%2000:15:31
Response
{
    "status": "ok"
}
Notes
Supported platform codes are 0=Generic, 1=Android, 2=iOS.
Supported target codes are 0=All, 1=Selected users, 2=Selected groups, 3=Selected devices.
Params target_users, target_groups and target_devices are comma separated list of id.
Scheduled time format is YYYY-MM-DD HH:MM:SS (e.g. 2016-07-23 00:19:11).
Params payload and context can be a string or a json.
Plugin Settings


The following options are available for push plugin:
| Option | Description |
| Auto app registration | Allow automatic creation of new applications by code. |
| Require user email | Require the user email to add the user id when register a device (as a security measure). |
| JSON Register | Enable JSON payload on register action. |
| JSON Notifications | Enable JSON payload on add notification action. |
| Protect Notifications | Enable token protection on add notification action. |
| Authorization Token | The token that enables the add notification action. |
| Batch size | Number of push messages to send out each batch job. |
| Log notifications | Enable logging of all notifications in a dedicated database table (useful for analytics purposes). |
| FCM URL | URL of Firebase Cloud Messaging server. |
| API key | Google API key. |
| Use FCM | Use FCM to send push messages on iOS too. |
| APNs URL | URL of Apple APNs server. |
| Timeout | APNs connection timeout. |
The Menu Module is implemented with the plg_jbackend_menu plugin. It provides functions related to Joomla menus (com_menus). Here is the list of supported methods.
Get the list of menus
Request parameters
action=get
module=menu
resource=menus
limit=<L> (optional)
offset=<O> (optional)
orderby=<field> (optional)
orderdir=<dir> (optional)
Example
<end-point>?action=get&module=menu&resource=menus&limit=<L>&offset=<O>
Example (REST format)
<end-point>/get/menu/menus?limit=<L>
Response
{
    "status": "ok",
    "total": <total items>,
    "limit": <pagination limit>,
    "offset": <pagination offset>,
    "pages_current": <current page>,
    "pages_total": <total pages>,
    "menus": [
        {
            "id": "<menu id>",
            "menutype": "<menu type>",
            "title": "<menu title>",
            "description": "<menu description>",
            "count_published": "<total published>",
            "count_unpublished": "<total unpublished>",
            "count_trashed": "<total trashed>"
        },
        ...
        {
            "id": "<menu id>",
            "menutype": "<menu type>",
            "title": "<menu title>",
            "description": "<menu description>",
            "count_published": "<total published>",
            "count_unpublished": "<total unpublished>",
            "count_trashed": "<total trashed>"
        }
    ]
}
Get a menu
Request parameters
action=get
module=menu
resource=menus
id=<N>
Example
<end-point>?action=get&module=menu&resource=menus&id=<N>
Example (REST format)
<end-point>/get/menu/menus/<N>
Response
{
    "status": "ok",
    "id": "<menu id>",
    "menutype": "<menu type>",
    "title": "<menu title>",
    "description": "<menu description>"
}
Get the list of menu items
Request parameters
action=get
module=menu
resource=items
menutype=<menutype>
parentid=<R> (optional)
level=<E> (optional)
limit=<L> (optional)
offset=<O> (optional)
orderby=<field> (optional)
orderdir=<dir> (optional)
Example
<end-point>?action=get&module=menu&resource=items&menutype=<menutype>&orderby=<field>&orderby=<dir>
Example (REST format)
<end-point>/get/menu/items?menutype=<menutype>
Response
{
    "status": "ok",
    "total": <total items>,
    "limit": <pagination limit>,
    "offset": <pagination offset>,
    "pages_current": <current page>,
    "pages_total": <total pages>,
    items: [
        {
            "id": "<article id>",
            "menutype": "<menu type>",
            "title": "<title>",
            "alias": "<alias>",
            "note": "<note>",
            "path": "<path>",
            "link": "<link>",
            "type": "<type>",
            "parent_id": "<parent id>",
            "level": "<level>",
            "component_id": "<component id>",
            "browserNav": "<browserNav>",
            "access": "<access>",
            "img": "<img>",
            "template_style_id": "<template style id>",
            "home": "<home>",
            "language": "<language>",
            "client_id": "<client id>",
            "language_title": "<language title>",
            "image": "<image>",
            "componentname": "<component name>",
            "access_level": "<access level>",
            "name": "<component name>"
        },
        ...
        {
            ...
        }
    ]
}